2. Basic concepts
Two basic concepts are very important when you want to work with The GIMP: selections and layers. Knowledge about these two concepts is much more helpful than knowing every exotic plug-in by heart.
2.1. Selections
Selections can restrict the area of interest for a plug-in. When you retouch a photo, you might not want to cover the whole image with a mosaic effect or just want to lighten certain areas of the face. To determine the target region you can create a selection, using lots of The GIMP's very flexible selection tools.
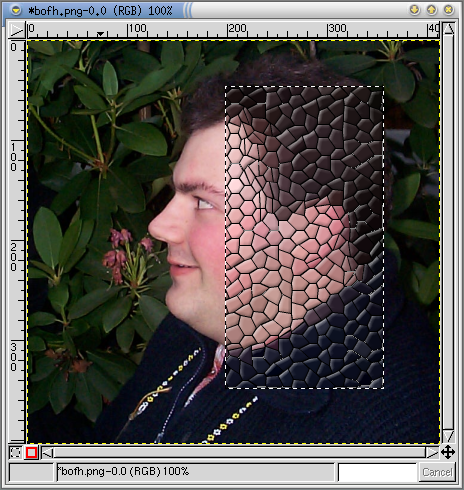
Silvan, partially attacked by a mosaic
The first six tools of the toolbox are responsible for selections. The rectangle, ellipse and freehand tool select the respective geometrical shapes or an area determined by the movement of the mouse. The next tool is the magic wand, that selects connected areas of similar colors. Following are the bezier tool and the so-called intelligent scissors, which provide methods to select areas bounded by bezier curves or hard contrasts.
2.1.1. Basic selection tools
It is important to mention, that the way these tools work can be modified with key combinations. You create a selection by pressing the mouse button, dragging the mouse and releasing the mousebutton. This may seem obvious, but it is important to get into this detail, because the key combinations have different effects depending on the point of time when the keys have been pressed.
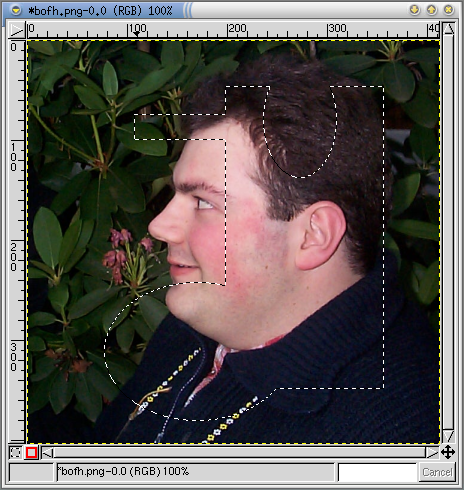
Here I used ellipse and rectangle tool with key combinations to create a complex selection
The key combination at the time of pressing the mousebutton down determines how the new selection gets combined with an already-existing selection. SHIFT adds the new selection to the existing one, CONTROL subtracts, SHIFT+CONTROL computes the intersection between both selections. when no key is pressed down, the new selection replaces the old one. Pressing the ALT key, allows you to move the existing selection around.
The key combination pressed at the time of releasing the mousebutton can modify the way the rectangle and ellipse tools work. Without additional keys you define two edges of the (bounding) rectangle. SHIFT restricts the aspect ratio: Usually squares and circles get created, but you can select other ratios in the respective tool options. CONTROL makes the coordinate of the first click the center of the shape. SHIFT+CONTROL combines both effects.
Of course you cannot learn this by just reading this text, you have to try it yourself. Fortunately The GIMP uses the pointer to indicate the selected action, so you are not left alone in the dark.
2.1.2. Advanced selection tools
The magic wand selects contiguous areas with similar colors. Clicking in the image determines the origin of the selection. The tolerance for similar colors can be determined while the mouse is clicked by dragging the mouse to the left (bigger tolerance) or to the right (lower tolerance). It is also possible to select the tolerance in the tool options.
The bezier tool is probably the most flexible of the selection tools. You can define a path – which gets saved in the native image format xcf – that can be converted in a selection. A tab in the Layers, Channels & Paths dialog is responsible for managing multiple paths. Here you can switch the operation mode of the tool between appending new points, inserting new points, deleting points and editing points. The latter works by clicking and dragging the tangents of an bezier curve, SHIFT makes both sides independent of each other, CONTROL moves the tangents as well as the anchor, ALT moves the whole curve.
Two hints: The intelligent scissors are not as useful as you might think. Usually you get better results by using the bezier tool. Secondly there exists another selection tool, which is not listed in the toolbox. Using <Image>/select/by color you can select by color – similar to the magic wand, but without the restriction to connected areas.
2.1.3. Selections vs. masks
Up to now The marching ants – the dotted border of an selection – suggested that the boundary of a selection is sharp. That is not true, the marching ants run around the area selected more than 50%. This may sound more complicated than it actually is. If a pixel happens to be partially selected an action – for example filling with red – does not fully affect it, a blue pixel would become violet. This can help reducing aliasing. When you are brightening areas of an image this possibility can be used to avoid sharp edges between the bright and dark areas.
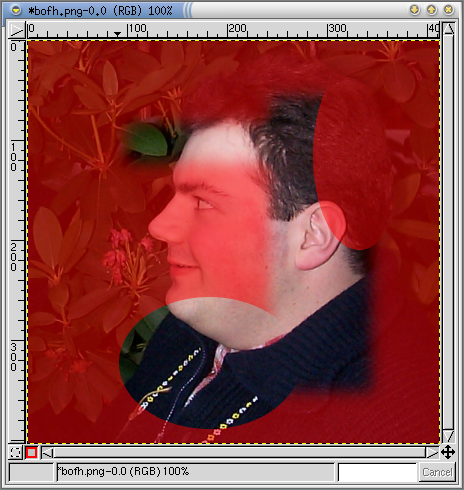
Using the quickmask to be able to recognize the strength of a selection in certain points
To avoid this mistakeable representation of a selection you can use the quickmask. Click on the red rectangle at the bottom left of the image window. Areas that are not selected get dyed red, depending on the strength of the selection a pixel is more visible in its original color. In this representation the selection can be modified with the regular paint tools. If you paint a white stroke on the red areas and switch back to the marching ants you can see, that the area of the stroke now is selected. You can use this method to match a selection to an object in an image.
with partially selected pixels an effect is weaker, in this image you can see the smooth and hard edges of the selection
2.2. Layers
The GIMP's other core concept – layers – can be used to organize different image components. You can think of the layer stack as a stack of slides. The topmost slides cover the slides beneath. Of course opaque slides on the top would cover all other slides, so to gain an advantage with this the upper layers should have some transparent areas...
To organize your layers you can use the layers, channels & paths dialog. Here you can see the layer stack, for a new image usually a single layer named Background. You can open a context menu by clicking on the layer's name. It contains various important commands, most notably the command to add a new layer to the image. The most important commands are also available via the buttons at the bottom of the dialog. The eye to the left of the layer preview indicates the visibility of the layer in the image.
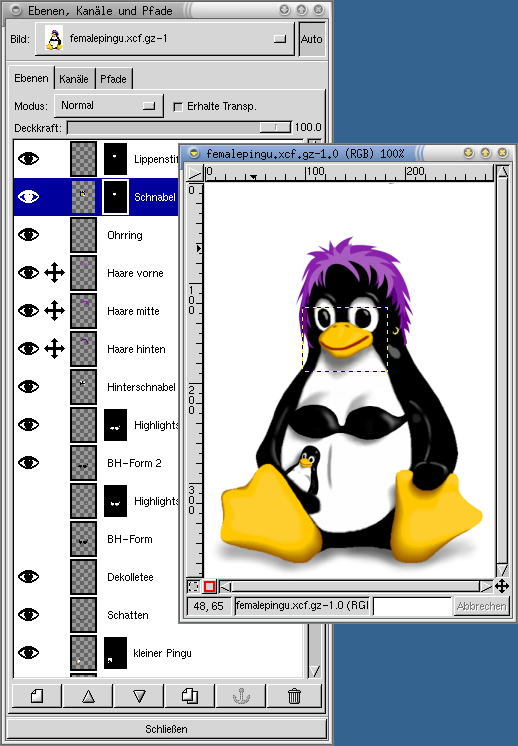
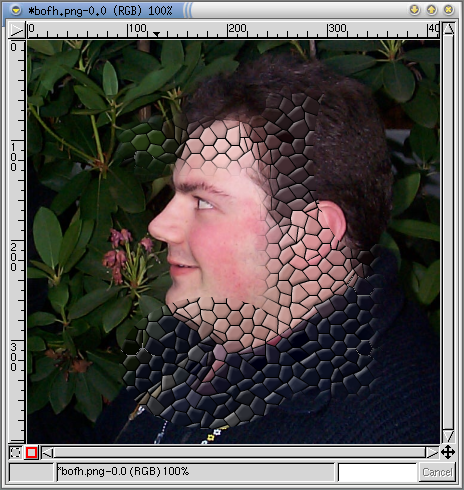
This image has been created with a complex layer structure. The layers, channels and paths is necessary to organize these.
When you operate with multiple layers, you have to be aware of the fact that most operations are restricted to the active layer, marked with a blue bar in the layers dialog. So you can paint onto a layer without destroying the content of the other layers. Don't try to save layers: You can easily merge multiple layers into one, but separating the content of a layer into multiple layers is much more complicated.
2.2.1. Basic operations
The above mentioned context menu contains the most important layer functions – scaling layers (that don't necessarily have the same size as the image), merge all visible layers – when you happen to have exaggerated a little bit... :-). Here you can also find functions to reorder the layer stack, so that the layers cover each other as intended. In the upper part of the dialog you can determine the way the respective layer gets combined with the layers beneath it. Normal fits the analogy with the slide stack best. Other modes can be used to create funky effects.
The toggle keep transparency is useful to protect the transparent areas of a layer. So you can use the brush tool to recolor complex objects by selecting a big brush and then generously painting strokes over the layer. Details will get preserved, as only the color information gets replaced.
2.2.2. Layer masks
Layer masks can be used to increase the transparency of a layer without touching the layers alpha channel. You can create a new layer mask via the context menu. This is only possible when the layer actually has an alpha channel, i.e., the ability to store transparency information, you have to create it if necessary. In the white areas of the layer mask the associated layer is fully visible, in the black areas it gets transparent. But since the information in the original layer remains unchanged, you can restore them by painting with white over the black areas of the layer mask.
This is very useful to release objects from unwanted background, since you can "erase" the background without having to care too much about the original, since it can be easily recovered.
I like to stress, that you cannot learn this stuff by simply reading the text. Only when you actually use this stuff you have a chance to unleash the power of The GIMP.